💡Check out the accompanying colab demo: Google Colaboratory demo
Hi there! 👋 In this article, I will show you a demo on how to train ChatGPT with the open-source dlt repository. Here is the article structure, and you can jump directly to the part that interests you. Let's get started!
I. Introduction
II. Walkthrough
III. Result
IV. Summary
I. Introduction
Navigating an open-source repository can be overwhelming because comprehending the intricate labyrinths of code is always a significant problem. As a person who just entered the IT industry, I found an easy way to address this problem with an ELT tool called dlt (data load tool) - the Python library for loading data.
In this article, I would love to share a use case - training GPT with an Open-Source dlt Repository by using the dlt library. In this way, I can write prompts about dlt and get my personalized answers.
II. Walkthrough
The code provided below demonstrates training a chat-oriented GPT model using the dlt- hub repositories (dlt and pipelines). To train the GPT model, we utilized the assistance of two services: Langchain and Deeplake. In order to use these services for our project, you will need to create an account on both platforms and obtain the access token. The good news is that both services offer cost-effective options. GPT provides a $5 credit to test their API, while Deeplake offers a free tier.
The credit for the code goes to Langchain, which has been duly acknowledged at the end.
1. Run the following commands to install the necessary modules on your system.
python -m pip install --upgrade langchain deeplake openai tiktoken
# Create accounts on platform.openai.com and deeplake.ai. After registering, retrieve the access tokens for both platforms and securely store them for use in the next step. Enter the access tokens grabbed in the last step and enter them when prompted

import os
import getpass

from langchain.embeddings.openai import OpenAIEmbeddings
from langchain.vectorstores import DeepLake

os.environ['OPENAI_API_KEY'] = getpass.getpass('OpenAI API Key:')
os.environ['ACTIVELOOP_TOKEN'] = getpass.getpass('Activeloop Token:')
embeddings = OpenAIEmbeddings(disallowed_special=())
2. Create a directory to store the code for training the model. Clone the desired repositories into that.
  # making a new directory named dlt-repo
!mkdir dlt-repo
# changing the directory to dlt-repo
%cd dlt-repo
# cloning git repos into the dlt-repo directory
# dlt code base
!git clone https://github.com/dlt-hub/dlt.git
# example pipelines to help you get started
!git clone https://github.com/dlt-hub/pipelines.git
# going back to previous directory
%cd ..
3. Load the files from the directory
import os
from langchain.document_loaders import TextLoader

root_dir = './dlt-repo' # load data from
docs = []
for dirpath, dirnames, filenames in os.walk(root_dir):
    for file in filenames:
        try:
            loader = TextLoader(os.path.join(dirpath, file), encoding='utf-8')
            docs.extend(loader.load_and_split())
        except Exception as e:
            pass
4. Load the files from the directory
import os
from langchain.document_loaders import TextLoader

root_dir = './dlt-repo' # load data from
docs = []
for dirpath, dirnames, filenames in os.walk(root_dir):
    for file in filenames:
        try:
            loader = TextLoader(os.path.join(dirpath, file), encoding='utf-8')
            docs.extend(loader.load_and_split())
        except Exception as e:
            pass
5. Splitting files to chunks
# This code uses CharacterTextSplitter to split documents into smaller chunksbased on character count and store the resulting chunks in the texts variable.

from langchain.text_splitter import CharacterTextSplitter
text_splitter = CharacterTextSplitter(chunk_size=1000, chunk_overlap=0)
texts = text_splitter.split_documents(docs)
6. Create Deeplake dataset
# Set up your deeplake dataset by replacing the username with your Deeplake account and setting the dataset name. For example if the deeplakes username is “your_name” and the dataset is “dlt-hub-dataset”

username = "your_deeplake_username" # replace with your username from app.activeloop.ai
db = DeepLake(dataset_path=f"hub://{username}/dlt_gpt", embedding_function=embeddings, public=True) #dataset would be publicly available
db.add_documents(texts)

# Assign the dataset and embeddings to the variable db , using deeplake dataset.
# Replace your_username with actual username
db = DeepLake(dataset_path="hub://"your_username"/dlt_gpt", read_only=True, embedding_function=embeddings)

# Create a retriever
retriever = db.as_retriever()
retriever.search_kwargs['distance_metric'] = 'cos'
retriever.search_kwargs['fetch_k'] = 100
retriever.search_kwargs['maximal_marginal_relevance'] = True
retriever.search_kwargs['k'] = 10
7. Initialize the GPT model
from langchain.chat_models import ChatOpenAI
from langchain.chains import ConversationalRetrievalChain

model = ChatOpenAI(model_name='gpt-3.5-turbo')
qa = ConversationalRetrievalChain.from_llm(model,retriever=retriever)
III. Result
After the walkthrough, we can start to experiment different questions and it will output answers based on our training from dlt hub repository.
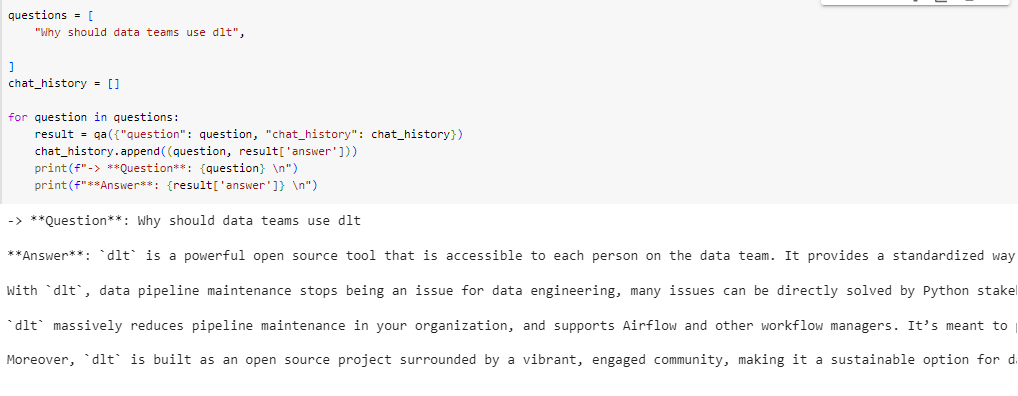
Here, I asked " why should data teams use dlt? "

It outputted:
- It works seamlessly with Airflow and other workflow managers, making it easy to modify and maintain your code.
- You have complete control over your data. You can rename, filter, and modify it however you want before it reaches its destination.
Next, I asked " Who is dlt for? "

It outputted:
dltis meant to be accessible to every person on the data team, including data engineers, analysts, data scientists, and other stakeholders involved in data loading. It is designed to reduce knowledge requirements and enable collaborative working between engineers and analysts.
IV. Summary
It worked! we can see how GPT can learn about an open source library by using dlt and utilizing the assistance of Langchain and Deeplake. Moreover, by simply follow the steps above, you can customize the GPT model training to your own needs.
Curious? Give the Colab demo💡 a try or share your questions with us, and we'll have ChatGPT address them in our upcoming article.
[ What's more? ]
- Learn more about [dlt] 👉 here
- Need help or want to discuss? Join our Slack community ! See you there 😊

